At some point we’ve all needed to know how to tie a tie. Whether it’s a refresher on how to tie a Windsor knot, or learning for the first time because you’ve finally decided to retire your old clip-on, knowing how to tie a tie is a vital tool to have in your sartorial pocket–especially if you have a wedding on the calendar (and don’t forget to learn how to tie a bow tie as well). Guests and grooms alike often need to slip one on for the big occasion and there are a variety of different ways to do it. From classic Windsor knots to more elaborate and elegant tie knots, here’s everything you need to know about tying a wedding tie.
Our step-by-step guide is sure to tie your wedding fit together.
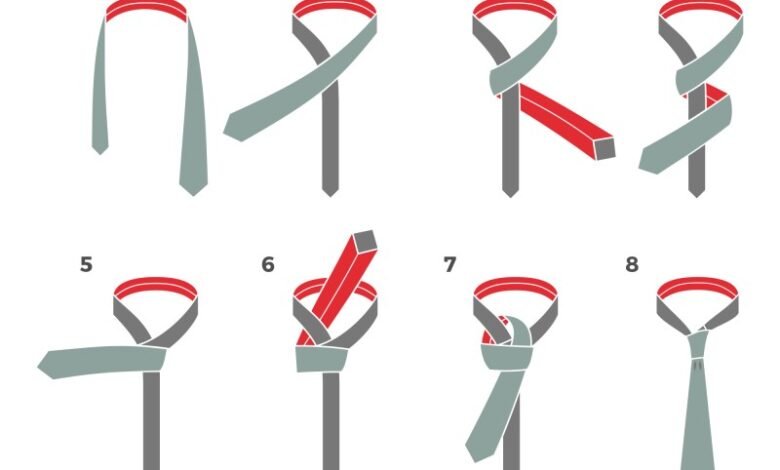
1. Start Position:
-
- Commence the process by standing confidently in front of a mirror, ensuring your shirt collar is neatly raised. As you begin, position the tie around your neck with precision, placing the wide end on the right and the narrow end on the left.
2. Length Adjustment:
- Commence the process by standing confidently in front of a mirror, ensuring your shirt collar is neatly raised. As you begin, position the tie around your neck with precision, placing the wide end on the right and the narrow end on the left.
-
- Next, meticulously tailor the length of the tie to your preference. Gently pull the narrow end either upward or downward until it gracefully aligns with your belt line.
3. Cross Over:
- Next, meticulously tailor the length of the tie to your preference. Gently pull the narrow end either upward or downward until it gracefully aligns with your belt line.
-
- Establish the foundational “X” shape by gracefully crossing the wide end over the narrow end. This fundamental step sets the stage for the knot’s formation.
4. Wrap Around:
- Establish the foundational “X” shape by gracefully crossing the wide end over the narrow end. This fundamental step sets the stage for the knot’s formation.
-
- Seamless in its execution, wrap the wide end behind the narrow end, beginning from the right and elegantly moving towards the left. This fluid motion lays the groundwork for subsequent maneuvers.
5. Bring Upward:
- Seamless in its execution, wrap the wide end behind the narrow end, beginning from the right and elegantly moving towards the left. This fluid motion lays the groundwork for subsequent maneuvers.
-
- Elevate the sophistication by lifting the wide end upward, skillfully passing it behind the emerging knot and down through the loop around your neck. This deliberate action contributes to the creation of an artful triangular shape.
6. Final Wrap:
- Elevate the sophistication by lifting the wide end upward, skillfully passing it behind the emerging knot and down through the loop around your neck. This deliberate action contributes to the creation of an artful triangular shape.
-
- Progress smoothly by continuing to wrap the wide end across the front of the knot, transitioning from the left side to the right. This added layer enhances the knot’s complexity and visual appeal.
7. Complete the Loop:
- Progress smoothly by continuing to wrap the wide end across the front of the knot, transitioning from the left side to the right. This added layer enhances the knot’s complexity and visual appeal.
-
- Conclude the intricate process by elevating the wide end once more and threading it down through the loop around your neck from the front. This final loop fortifies the knot’s structure with finesse.
8. Tighten the Knot:
- Conclude the intricate process by elevating the wide end once more and threading it down through the loop around your neck from the front. This final loop fortifies the knot’s structure with finesse.
-
- Finishing with finesse, hold the narrow end securely with one hand, and with a controlled motion, slide the knot upwards using the other hand. This pivotal step ensures the tie knot achieves the perfect balance of tightness, resulting in a polished and well-proportioned appearance.
These detailed steps, accompanied by transitional words, provide a comprehensive guide to tying a basic four-in-hand knot. With practice, you’ll become adept at quickly and efficiently creating a neat and symmetrical tie knot.